 DRM-X 6.0
Desktop Packager: step-by-step
Package video or audio, check Content IDs, choose encryption, copy CLI commands and recover uploads with illustrated Windows instructions.
Before you start#
Use the Windows x64 DRM-X 6.0 Packager Suite from Console → Package Content. Extract the whole ZIP into a writable folder. Keep DRMX-6.0-Desktop-Packager.exe, drmx-packager-cli.exe, FFmpeg, FFprobe and Shaka Packager together; Desktop invokes the included CLI.
- Prepare a source video or audio file on a local drive and enough free space for temporary encoded renditions and protected output.
- In your DRM-X environment's Settings, obtain the Site ID, Packager Access Key and Packager KMS Token. These are packaging credentials, not a viewer DRM License Token.
- For managed upload, make sure your environment has a ready 1AICLOUD destination and sufficient storage entitlement. Customer-owned destinations must first be verified in Cloud Storage.
Use Packager Suite 1.0.0-beta.1 or newer for audio-only sources, identity preflight and the simplified interface described here. See large-video planning before a three-hour, 4K or 8K job.
1. Connect a Packager profile#
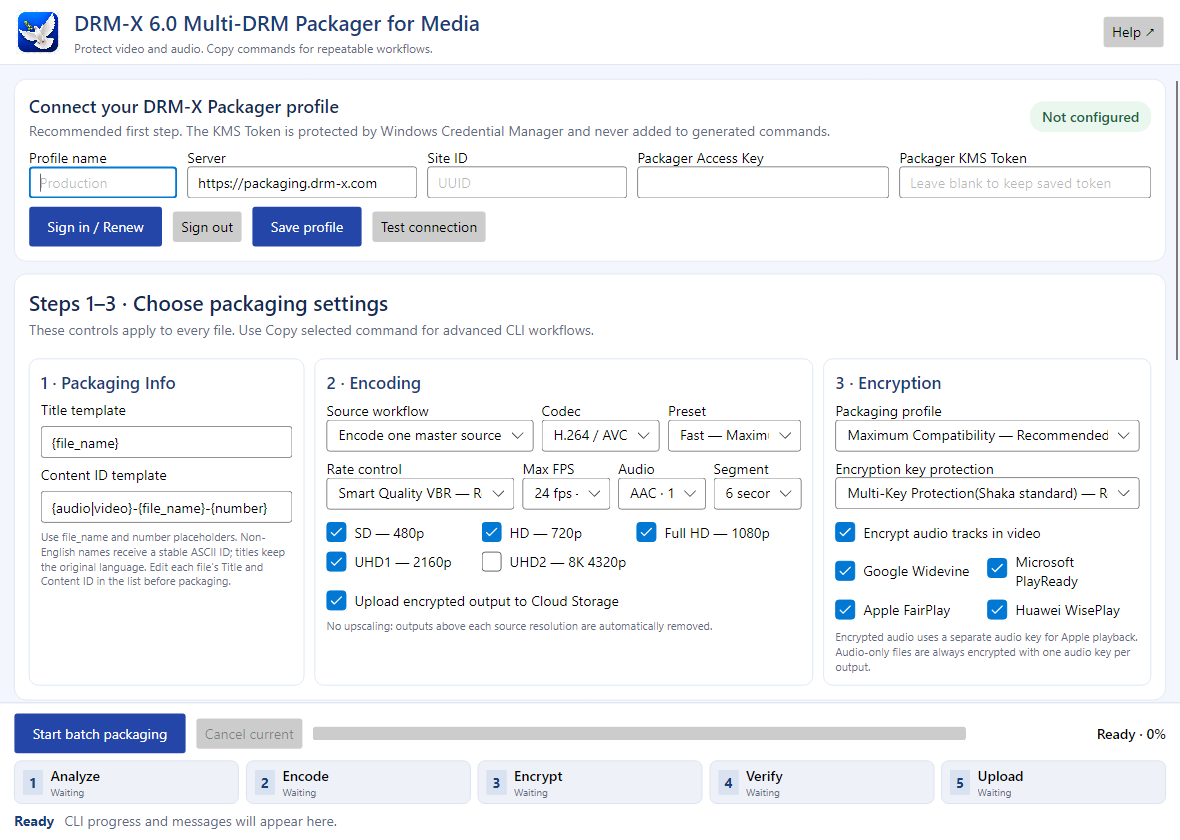
- Open
DRMX-6.0-Desktop-Packager.exe, identified by the DRM-X dove logo. - Enter a recognizable profile name, such as Production.
- Keep Server as
https://packaging.drm-x.com, unless your DRM-X administrator supplied a different server. - Enter the Site ID, Packager Access Key and Packager KMS Token from the same environment.
- Use Sign in / Renew to authorize the Packager in your browser, or enter the three environment values manually. Click Save profile, then Test connection. Resolve any authentication error before adding a large batch.
The KMS Token is stored in Windows Credential Manager. You can use this profile in both Desktop and the CLI with --profile "Production". A saved profile is not proof that credentials are still active; Test connection checks the server. Never put the KMS Token into a command or a screenshot.
2. Set packaging information#
The read-only Title template and Content ID template show how initial values are generated. Double-click a file row to edit its Title or Content ID. The defaults substitute the source filename and batch number. Review the generated IDs in the file table; each new content item needs a unique ID. Your backend later uses that Content ID to authorize the published content. After adding a file or editing its identity, Desktop checks the Content ID and title in the selected environment. Resolve “Needs attention” messages before starting. The check does not reserve an identity; the server checks again when creating the package and never overwrites an existing item.
3. Choose encoding settings#
| Control | A practical starting point |
|---|---|
| Source workflow | Encode one master source for an ordinary MP4/MOV/MKV video. Use pre-encoded renditions only when you already have the final tracks and understand the CLI input mapping. |
| Codec and preset | H.264 / AVC and Fast for the broadest starting compatibility. H.265 / HEVC or AV1 require player and device validation, particularly for UHD. |
| Rate control | Smart Quality VBR adapts the encoded bitrate to the source. Predictable Bitrate is useful when delivery-size planning matters more. Both still need a test clip. |
| Max FPS | Choose an appropriate cap for your audience. A 24 fps cap discards motion detail from higher-frame-rate sources; use 30 or 60 fps when needed and supported. |
| Audio and segment | AAC 128 Kbps and 6 seconds are useful starting settings. Four-second segments create about 50% more segment objects. |
| Resolution ladder | For 1080p, select SD, HD and Full HD. Add UHD for a 3840×2160 source or UHD2 for a 7680×4320 source. The CLI removes rungs larger than the source; it never upscales to create missing detail. |
Encoding a master is automatic: you do not need to encode the ladder in another application first. Right-click a file to add audio languages or subtitles. Use Copy selected command when you need advanced CLI options.
4. Choose encryption and upload#
Maximum Compatibility produces complementary protected outputs for enabled DRM systems. Modern Multi-DRM uses a shared CBCS workflow where supported. Maximum Compatibility applies its H.264, 24 fps and SDR compatibility constraints. Choose Modern Multi-DRM when testing H.265 or AV1 workflows. Keep Multi-Key Protection(Shaka standard) for separate track protection, or choose Single Video Key Protection when all video qualities should share one video key; encrypted audio uses a separate audio key. Keep Audio Track Encryption enabled unless your video application intentionally uses clear audio. Audio-only content always uses encrypted audio; Desktop applies this requirement even when Single Video Key Protection is selected.
Select the DRM systems you will test: Widevine, FairPlay, PlayReady and WisePlay. Selecting a DRM or an 8K rung does not make every device capable of playing it. Keep upload enabled to publish to the configured storage destination; disable it to retain only local protected output.
5. Add files and run the batch#
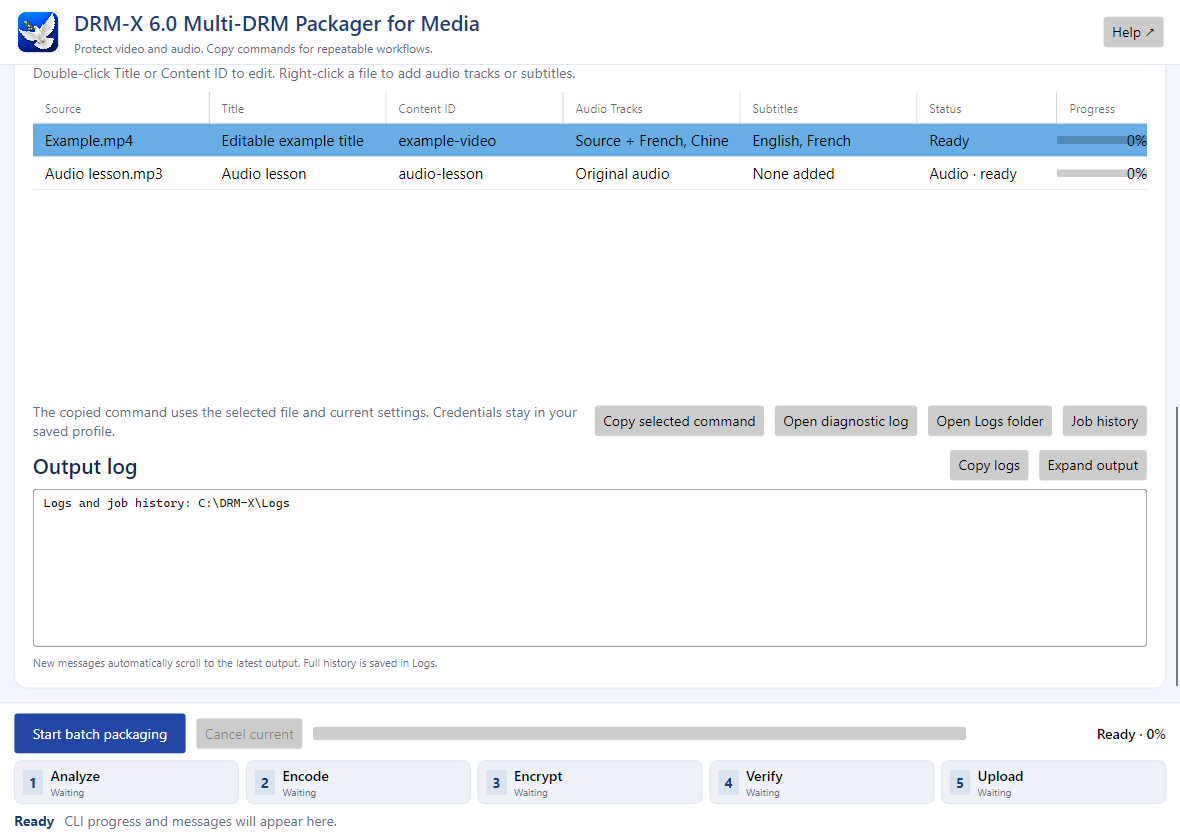
- Click Add source files. You can select multiple sources.
- Review each title and Content ID. Remove an unwanted row with Remove selected.
- Click Choose Output Path. Desktop creates a separate content folder for each item. Each destination must be empty for a new packaging run.
- Settings apply directly to the batch and to the copied command. After editing a row, press Enter or leave the row to finish the edit. Resolve duplicate identities and review the source-duration warning.
- Select a row and choose Copy selected command to copy its complete CLI command, including current controls, title, Content ID, output folder, additional audio and subtitles. Paste it into your terminal to review or extend it. The command refers to your saved profile and contains no KMS Token. Keep the suite in the referenced location.
- Click Start batch packaging. Files run sequentially; the CLI uploads objects within the current file's package in parallel.
The phase cards report Analyze → Encode → Encrypt → Verify → Upload. Encoding and encryption can take much longer for UHD sources. At 99%, uploaded output is undergoing server verification. Wait for completion; an uploaded file count alone does not mean Published.
6. Recover an interrupted upload#
If the log says Local encryption and verification completed, but managed upload did not finish, keep the entire protected output folder. Copy the Packaging Session ID and resume command from the log. Run the CLI upload command using your saved profile; do not start a new packaging batch against that folder. Matching completed 1AICLOUD objects are reused.
Cancel current requests cooperative cancellation. Do not rename, edit or delete the protected output while it is being uploaded. If interruption occurred during encoding or encryption, use a new empty output folder for a new package; upload-only recovery requires completed local encryption.
7. Test the published content#
- Open the test player.Go to the DRM-X Web Player and sign in with the DRM-X customer account that owns the content.
- Find your published item.Select the same environment used in your Packager profile. Choose the Published item from the protected-content list and check its Title and Content ID.
- Press Play.Keep the detected key model and a matching policy. The player requests a fresh DRM License Token for this attempt.
- Check each feature.Test sound, seek, permitted quality, every audio language, subtitles, playlist navigation and Repeat All on your target devices. For audio-only content, check audible output and the advancing clock.
- Finish the test.Press Stop. Keep the source and protected output until publication and playback have been verified.
If the item is missing, check its environment and Published status. If only Auto or lower qualities are available, check the packaged ladder, matching policy and device support. Use playback troubleshooting for errors before connecting your website.
Connect the content to your website
Follow Create server integration credentials, download the kit for your backend, then add the player using Web SDK integration. Your viewers sign in to your website. Your backend checks their access and requests the playback session; viewers do not need the DRM-X account used for this test.
8. Package audio-only content#
Choose Encode one master source, then add an MP3, AAC, M4A, WAV or FLAC file. Desktop probes the actual streams, shows Audio · ready and converts audio to AAC for protected streaming. Album-cover attachments are artwork, not video. Video codec, frame-rate and resolution-ladder settings do not create a video track for an audio-only source.
Maximum Compatibility creates complementary CENC DASH and CBCS CMAF outputs. Modern Multi-DRM creates CBCS output. Select only DRM systems enabled in your environment and verify their playback on your target devices. A valid package does not prove that every browser supports the selected DRM and encryption scheme.
Supply public HTTPS artwork through your application's playlist metadata, or use the player's audio placeholder. Artwork is optional. Play, pause, seek, volume, playlist navigation and repeat remain available for audio.
Review short sources
For a source ten seconds or shorter, check that you selected the complete file. Desktop asks you to continue or cancel before packaging. Short clips and ads are supported when intentional; longer content should normally exceed ten seconds. The CLI prints the same warning for unattended workflows.
9. Additional tracks and help#
Right-click a source row to add audio tracks or subtitles. Review each track's display name and BCP-47 language, such as en, fr or zh-Hans. Remove added tracks from the same menu. Alternate audio must cover the complete source timeline within two seconds; the Packager rejects a short narration attached to a much longer video. Prepare a full-length track before retrying. It does not silently loop, pad or cut your audio.
Pre-encoded input is an advanced workflow: supply compatible encoded audio and video, and use the copied CLI command for multiple rendition inputs. Audio-only pre-encoded input must be AAC. Use the master-source workflow when FFmpeg needs to convert another audio codec.
The Help button opens this tutorial at its permanent address, docs.drm-x.com/packaging/desktop. For a failed job, review the current phase and log, correct the reported issue, and use a new identity and empty output folder when starting a new package. Use upload recovery instead when local encryption already completed.
Read progress and keep recovery details#
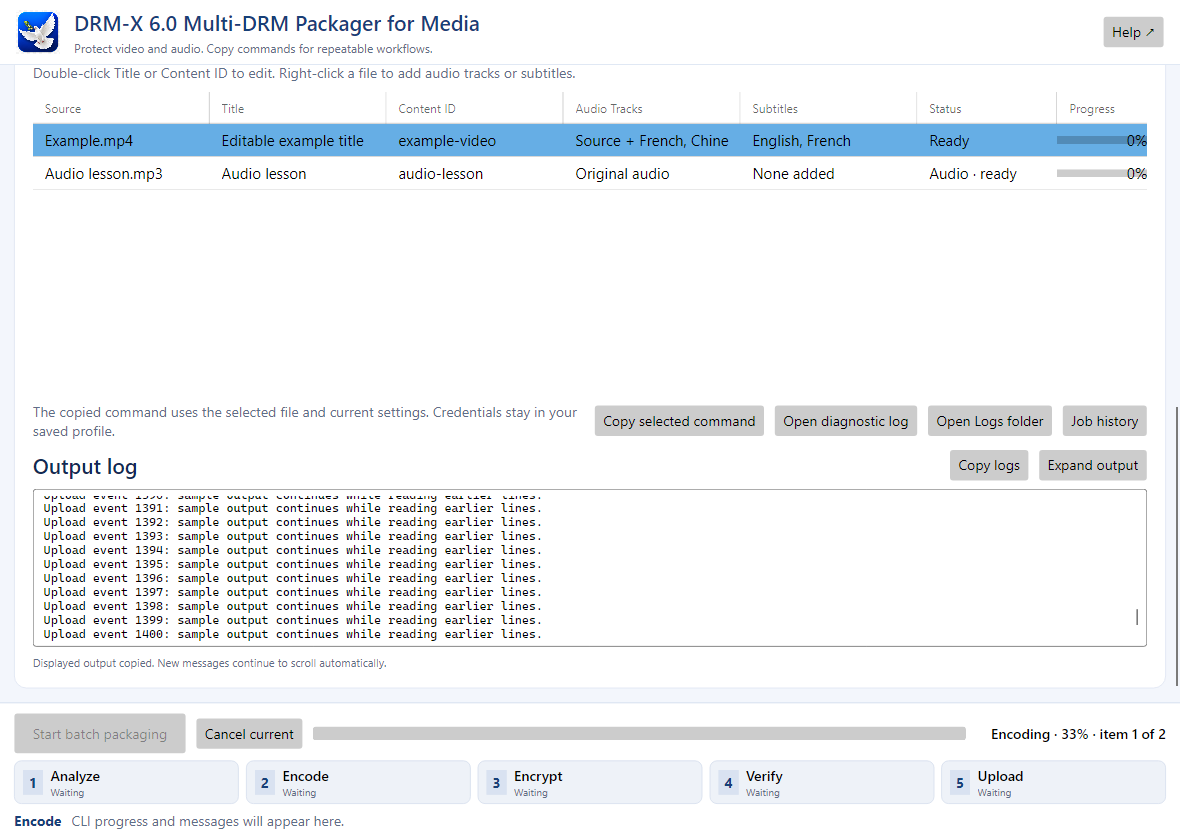
Use Copy logs for the displayed output, or select part of the read-only log and press Ctrl+C. Expand output gives more room. Open diagnostic log, Open Logs folder and Job history help you find earlier details. Settings lock while a job runs; log tools and Cancel current remain available. New messages scroll to the latest output automatically.
After the Web Player test passes, follow server credentials, Web SDK integration and the integration download guide. Your website uses its own login and entitlement check. The customer Web Player is a test tool; it does not replace your website's backend.