 DRM-X 6.0
Amazon S3 and CloudFront: step by step
Connect a private S3 bucket to DRM-X 6.0 with scoped IAM permissions, browser CORS, CloudFront HTTPS delivery and an upload verification checklist.
暗号化された動画と DRM ライセンスは別の経路で配信されます
CDN は暗号化された動画を配信します。バックエンドが視聴権限を確認し、DRM ライセンスサービスが対応デバイスでの復号を許可します。
- ストレージ / CDN
暗号化されたメディアをプレーヤーに配信します。
- お客様のバックエンド
視聴権限を確認し、DRM-X に再生の認可をリクエストします。
- DRM-X
再生の認可情報を検証し、DRM ライセンスリクエストを処理します。
- プレーヤー + デバイス
デバイスの DRM システムを使ってライセンスを取得し、暗号化されたメディアを再生します。
This step-by-step guide is currently available in English.
1. Understand the connection#
DRM-X uploads directly to S3 using signed requests. Viewers download encrypted media through CloudFront over HTTPS. Keep S3 Block all public access enabled; CloudFront gets scoped read access through Origin Access Control (OAC).
CloudFront supplies a working https://….cloudfront.net hostname that can be used in production. Your own domain is optional. Public delivery exposes the object bytes; DRM still controls decryption of correctly packaged media. CORS is not authorization. This guide uses ordinary public CDN delivery; viewer signed URLs or cookies require a separate integration.
2. Create your S3 bucket#
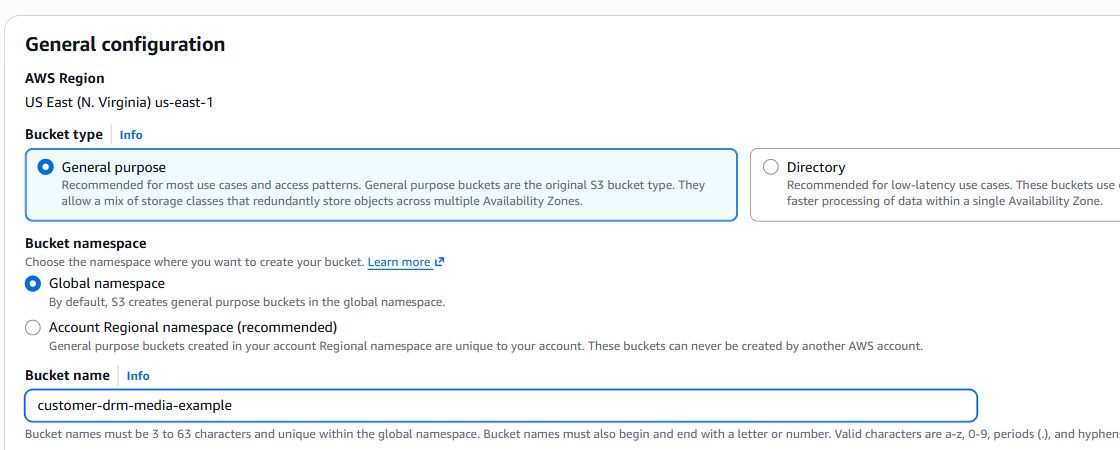
- Open Amazon S3 → General purpose buckets → Create bucket.
- Select a region and record its code, such as
us-east-1. Choose General purpose. If asked for a namespace, use Global namespace for this walkthrough. - Enter your own globally unique bucket name. Keep Object Ownership → ACLs disabled (Bucket owner enforced).
- Keep Block all public access checked. You will give CloudFront access through a scoped policy.
- For this walkthrough keep Default encryption → Server-side encryption with Amazon S3 managed keys (SSE-S3). This is additional storage encryption, not a replacement for DRM packaging. SSE-KMS requires extra uploader and CloudFront KMS permissions.
- Review and create the bucket. Do not enable S3 static website hosting.
3. Create a scoped IAM user and access key#
- Open IAM → Policies → Create policy → JSON. Paste the policy below, replacing the example bucket name everywhere.
- The example allows only
protected/. If you use another base path, update both the prefix condition and object ARN. For bucket-root use, remove the ListBucket prefix condition and usearn:aws:s3:::YOUR_BUCKET/*for objects. - Save the policy. Open IAM → Users → Create user, create a dedicated integration user without AWS Console access, and attach only this policy.
- Open the user's Security credentials → Access keys → Create access key. Choose the use case for an application running outside AWS and follow the prompts. Securely retain the Access key ID and Secret access key for DRM-X.
{
  "Version": "2012-10-17",
  "Statement": [
    {
      "Sid": "ListProtectedFolder",
      "Effect": "Allow",
      "Action": "s3:ListBucket",
      "Resource": "arn:aws:s3:::customer-drm-media-example",
      "Condition": {
        "StringLike": {
          "s3:prefix": [
            "protected",
            "protected/",
            "protected/*"
          ]
        }
      }
    },
    {
      "Sid": "BucketRegion",
      "Effect": "Allow",
      "Action": "s3:GetBucketLocation",
      "Resource": "arn:aws:s3:::customer-drm-media-example"
    },
    {
      "Sid": "ManageProtectedObjects",
      "Effect": "Allow",
      "Action": [
        "s3:GetObject",
        "s3:PutObject",
        "s3:DeleteObject"
      ],
      "Resource": "arn:aws:s3:::customer-drm-media-example/protected/*"
    }
  ]
}
Do not use root keys or AdministratorAccess. Copying uses GetObject and PutObject; there is no separate s3:CopyObject IAM action. Renaming also needs DeleteObject. This guide follows DRM-X's current access-key form; a role ARN alone does not replace the key pair.
4. Configure S3 CORS for browser uploads#
- Open your S3 bucket → Permissions.
- Scroll to Cross-origin resource sharing (CORS) → Edit.
- Paste this JSON, replacing
https://www.example.comwith the website embedding your player. Keep the DRM-X Console origin. Preserve other required rules in existing buckets. - Select Save changes. Keep Block Public Access enabled: CORS does not make the bucket public.
[
  {
    "AllowedOrigins": [
      "https://6.drm-x.com"
    ],
    "AllowedMethods": [
      "PUT"
    ],
    "AllowedHeaders": [
      "Content-Type",
      "x-amz-meta-drmx-sha256"
    ],
    "ExposeHeaders": [
      "ETag"
    ],
    "MaxAgeSeconds": 3600
  },
  {
    "AllowedOrigins": [
      "https://6.drm-x.com",
      "https://multi-drm.drm-x.com",
      "https://www.example.com"
    ],
    "AllowedMethods": [
      "GET",
      "HEAD"
    ],
    "AllowedHeaders": [
      "Range"
    ],
    "ExposeHeaders": [
      "ETag",
      "Content-Length",
      "Content-Range",
      "Accept-Ranges"
    ],
    "MaxAgeSeconds": 3600
  }
]
Uploads go directly to S3, so PUT CORS belongs on S3. Playback through CloudFront also needs the CDN configuration in step 5.
5. Create your CloudFront HTTPS delivery URL#
- Open CloudFront → Distributions → Create distribution. Use a standard distribution. If AWS shows an onboarding or pricing-plan selection, review and choose the plan appropriate to your account before creating resources.
- Select the bucket's normal S3 REST origin, not its website endpoint. Leave Origin path empty for the folder mapping used in this guide.
- Choose Origin access control settings (recommended). Create or select an OAC with Sign requests (recommended).
- Set viewer protocol policy to Redirect HTTP to HTTPS or HTTPS only. Allow GET, HEAD, OPTIONS. Uploads use the S3 endpoint, so CloudFront does not need PUT.
- Create the distribution. Apply the CloudFront-generated bucket policy under S3 → bucket → Permissions → Bucket policy → Edit. Merge with required existing statements. Restrict access to this distribution's ARN. The example below limits reads to
protected/. - Open CloudFront → Policies → Response headers → Create response headers policy. Configure the CORS fields in the table below. Attach this policy to the distribution's media/default behavior.
- Wait for deployment to complete. Copy Distribution domain name. Your delivery origin is
https://YOUR_DISTRIBUTION.cloudfront.net.
| Response headers policy field | Value |
|---|---|
| Access-Control-Allow-Origin | Your exact player origins, plus https://6.drm-x.com and https://multi-drm.drm-x.com for DRM-X tests. |
| Access-Control-Allow-Methods | GET, HEAD, OPTIONS |
| Access-Control-Allow-Headers | Range |
| Access-Control-Expose-Headers | ETag, Content-Length, Content-Range, Accept-Ranges |
| Access-Control-Allow-Credentials | Disabled for this public encrypted-media workflow. |
| Access-Control-Max-Age | 3600 |
| Origin override | Enabled so CloudFront controls viewer-facing CORS consistently. |
For OPTIONS preflight, attach the managed CORS-S3Origin origin request policy. It forwards Origin, Access-Control-Request-Method and Access-Control-Request-Headers to S3. Initially cache GET/HEAD only, leaving OPTIONS caching disabled. If you later cache OPTIONS, include these headers in its cache key and test different player origins; forwarding a header alone does not add it to the cache key.
{
  "Version": "2012-10-17",
  "Statement": [
    {
      "Sid": "AllowThisCloudFrontDistribution",
      "Effect": "Allow",
      "Principal": {
        "Service": "cloudfront.amazonaws.com"
      },
      "Action": "s3:GetObject",
      "Resource": "arn:aws:s3:::customer-drm-media-example/protected/*",
      "Condition": {
        "StringEquals": {
          "AWS:SourceArn": "arn:aws:cloudfront::111122223333:distribution/EEXAMPLE123"
        }
      }
    }
  ]
}
Replace the example account ID, distribution ID and bucket name. The SourceArn must identify the distribution you just created. After header changes, invalidate affected test/media paths if earlier responses remain cached.
Optional: use media.example.com
- Request an ACM public certificate covering your hostname in US East (N. Virginia), us-east-1, and complete DNS validation.
- Add the hostname under the distribution's Alternate domain names and attach its certificate.
- At your DNS provider, create the CNAME or supported alias pointing to the CloudFront hostname. Wait for DNS, certificate and distribution deployment.
- Use
https://media.example.comas your delivery origin. A DNS CNAME alone is insufficient without the CloudFront domain and certificate setup.
6. Connect Amazon S3 to DRM-X 6.0#
Open Cloud Storage → Connect storage. Choose Amazon S3.
| Field | What to enter |
|---|---|
| Display name | A friendly label, such as Production S3. |
| Bucket name | The exact name, without s3://. |
| Region | The bucket's exact AWS region code. |
| Protected-content base path | protected, matching the IAM and bucket policies. |
| Public URL prefix | https://YOUR_DISTRIBUTION.cloudfront.net/protected or https://media.example.com/protected. |
| Access key ID / Secret access key | The dedicated IAM user's key pair. |
The examples use a folder called protected. The bucket name is not automatically a folder. With the direct domain-to-bucket mapping used here, include the same storage folder exactly once in the public URL prefix.
Bucket:                      customer-drm-media-example
Protected-content base path: protected
Public URL prefix:           https://media.example.com/protected
File selected for upload:    sample.encrypted.bin
Object key in the bucket:    protected/sample.encrypted.bin
Preview URL:                 https://media.example.com/protected/sample.encrypted.bin
To use the bucket root, leave the base path blank and enter only the delivery origin as the public prefix. Do not append a bucket name unless you deliberately use it as a folder. Leave CloudFront Origin path empty for this mapping.
Select the default upload destination if desired, then Save and verify. The S3 API hostname is not your CloudFront delivery URL.
Generate your CORS and matching URL fields
This tool runs in your browser. Enter public origins only; it does not ask for access keys.
- Protected-content base path
- Public URL prefix
- Example object key
- Example complete URL
7. Upload a file and verify that it works#
- Open Cloud Storage, select this destination and choose Verify location. Success means the DRM-X server can list the bucket. It does not establish write permission, browser CORS or public delivery.
- Select Upload encrypted files and choose one small encrypted segment from an existing DRM-X package. If you do not have a package, use the disposable encrypted diagnostic below. Do not upload an original video or personal document.
- Wait for the success message. Check that the filename and size appear in Cloud Storage. Find the same object under
protected/in your provider console. - Click Preview URL, and test that same object in a private browser window. It should download or return HTTP 200 without an AWS or Cloudflare login. Test an actual object: a domain's root can return 403/404 even when object delivery works.
- Check cross-origin delivery from your player website. Its browser Network panel should show
Access-Control-Allow-Originmatching the player page's origin. A direct address-bar download does not test CORS. The terminal example below also checks the headers. - Remove only your disposable diagnostic object when done. Then follow the Desktop Packager guide, select this storage destination in Package content, and upload the complete encrypted package. Manually uploading a file does not register a Published Content ID.
- Test the resulting Published file in Universal Playback Lab and your own player website. Verify video, audio, seeking and your required devices. A successful binary download is not proof of DRM playback.
No encrypted sample? Create a disposable test file on Windows
Run this in Windows PowerShell in a temporary folder you control. It encrypts a short non-personal message with a one-use AES key held only in memory. The output is a storage diagnostic, not playable media; it contains no DRM content key or customer data.
$samplePath = Join-Path (Get-Location) 'drmx-storage-check.encrypted.bin'
if (Test-Path -LiteralPath $samplePath) { throw 'Choose a new folder; this test file already exists.' }
$aes = [System.Security.Cryptography.Aes]::Create()
try {
    $aes.GenerateKey()
    $aes.GenerateIV()
    $encryptor = $aes.CreateEncryptor()
    try {
        $bytes = [Text.Encoding]::UTF8.GetBytes('DRM-X disposable storage check')
        $encrypted = $encryptor.TransformFinalBlock($bytes, 0, $bytes.Length)
        [IO.File]::WriteAllBytes($samplePath, $encrypted)
    } finally { $encryptor.Dispose() }
} finally { $aes.Dispose() }
Get-Item -LiteralPath $samplePath | Select-Object Name, Length
Upload drmx-storage-check.encrypted.bin, verify its size and Preview URL, then remove it from the bucket.
curl.exe -I -H "Origin: https://www.example.com" "https://media.example.com/protected/sample.encrypted.bin"Replace both URLs. Expect HTTP 200 and an allowed origin matching your player website. For range delivery, a GET request with Range: bytes=0-15 should return HTTP 206 and a valid Content-Range header. Preserve media MIME types: DASH manifests use application/dash+xml, HLS playlists use application/vnd.apple.mpegurl, and media files must use their appropriate media type.
8. Troubleshoot your result#
| Result | Action |
|---|---|
| Verify passes; browser upload fails | Inspect the browser Console and Network panels. Allow PUT CORS from the exact Console origin and Content-Type. Also check connectivity and retry for a fresh presigned URL. |
| Upload returns 403 | Check object write permission, bucket/folder scope, endpoint, region, request expiry and clock. Do not share signed upload URLs. |
| Upload succeeds; public URL returns 403 | Check whether public delivery is enabled and the domain/distribution has finished deploying. |
| Public URL returns 404 | Compare the full URL against the exact object key. Check missing or duplicated folders and filename case. |
| URL opens directly; player fetch fails | Add the player page origin to GET/HEAD CORS. Check CDN response headers and invalidate affected stale cached responses. |
| Download succeeds; playback fails | Check package publication, manifest paths, MIME types and DRM license authorization. See playback troubleshooting. |
CloudFront 403: confirm that OAC signs requests, the bucket policy uses the correct distribution ARN and prefix, and the origin is the S3 REST endpoint. Keep S3 Block Public Access on. Check KMS permissions if you chose SSE-KMS.
Official references#
- Create an S3 bucket
- Manage IAM access keys
- S3 CORS configuration
- CloudFront OAC and S3 bucket policies
- CloudFront response headers
- Managed origin request policies
- Custom domains and certificates
Using Cloudflare? Follow Cloudflare R2 setup.