 DRM-X 6.0
Cloudflare R2: bucket, CORS and delivery
Create an R2 bucket, configure upload and playback CORS, connect a custom domain or r2.dev testing URL, and verify an upload through DRM-X 6.0.
암호화된 동영상과 DRM 라이선스는 서로 다른 경로로 전달됩니다
CDN은 암호화된 동영상을 전달합니다. 백엔드가 접근 권한을 확인하고, DRM 라이선스 서비스가 호환 기기에서의 복호화를 승인합니다.
- 스토리지 / CDN
암호화된 미디어를 플레이어에 전달합니다.
- 고객 백엔드
시청 권한을 확인하고 DRM-X에 재생 승인을 요청합니다.
- DRM-X
재생 승인 정보를 검증하고 DRM 라이선스 요청을 처리합니다.
- 플레이어 + 기기
기기의 DRM 시스템으로 라이선스를 받아 암호화된 미디어를 재생합니다.
This step-by-step guide is currently available in English.
Public delivery makes object bytes reachable by URL; DRM controls decryption of correctly packaged media. CORS is a browser compatibility rule, not authorization. These real console screenshots exclude account headers and personal identifiers. Menu wording may change.
1. Create your R2 bucket#
- Sign in to Cloudflare and choose the account that will own the bucket.
- Open Storage & databases → R2 Object Storage → Overview → Create bucket.
- Enter a unique bucket name, such as
customer-drm-media-example. Select an appropriate location or jurisdiction. Use Standard storage for this walkthrough, then create the bucket. - Open the bucket's Settings. Record the bucket name, Cloudflare account ID and General → S3 API endpoint.
For default jurisdiction, the API endpoint is https://<ACCOUNT_ID>.r2.cloudflarestorage.com. If Cloudflare shows a jurisdiction-specific hostname, use that exact hostname. Remove a trailing /bucket-name when entering the endpoint in DRM-X; the bucket name has its own field. This API endpoint is not a public playback URL.
2. Create bucket-scoped credentials#
- Return to R2 Overview and open Manage API tokens. Choose an R2 account token, or a user token if required by your organization.
- Select Create API token, give it a recognizable name, and choose Object Read & Write.
- Choose Apply to specific buckets only and select this bucket. Configure expiry according to your policy. For this walkthrough, leave optional IP filtering unset. If your security policy requires it, validate both DRM-X server access and direct uploads from customer browser networks.
- Create the token and securely record the Access Key ID and Secret Access Key for DRM-X.
3. Choose your public delivery URL#
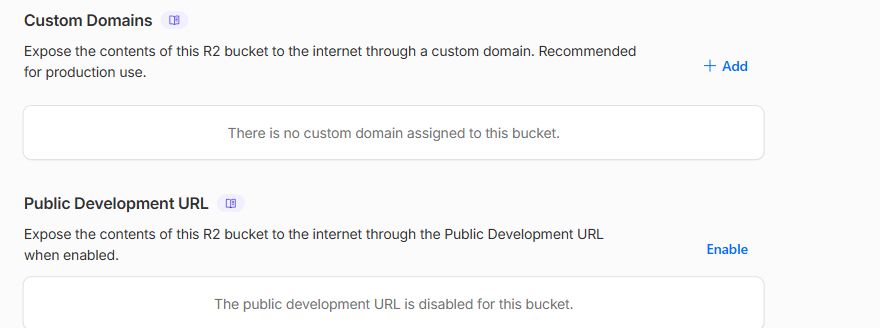
Option A: connect your domain for production
- Have a domain with its DNS setup completed in the same Cloudflare account. Choose a subdomain such as
media.example.com. - In the bucket, open Settings → Custom Domains → Add. Enter the subdomain, review the DNS change, and connect it using this R2 workflow.
- Wait for the domain and HTTPS certificate to become active. Your delivery origin is
https://media.example.com.
Do not create a CNAME pointing to an r2.dev address. Use R2's Custom Domains workflow. The development URL can stay disabled when a custom domain is connected.
Option B: enable Cloudflare's URL for testing
- Open Settings → Public Development URL → Enable.
- Review the public-access notice, type
allowwhen requested, and confirm. - Copy the actual
https://pub-….r2.devURL displayed by Cloudflare. Do not construct it from your account ID or bucket name.
The r2.dev endpoint is rate-limited and intended for development. Use a custom domain for production, caching and Cloudflare security features.
4. Configure browser upload and playback CORS#
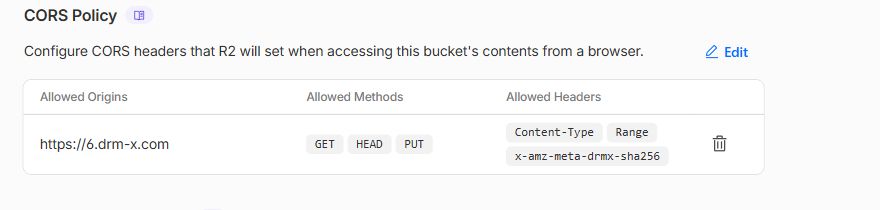
- Open Settings → CORS Policy → Add CORS policy (or Edit).
- Paste the JSON below in the editor. Replace
https://www.example.comwith the origin of the website that embeds your player. An origin includes HTTPS and the hostname, but no page path such as /watch. - Preserve other required rules if the bucket already has a policy, then select Save.
- Allow time for propagation, then retry the upload. If custom-domain objects have old CORS headers cached, purge the affected paths and test again.
[
  {
    "AllowedOrigins": [
      "https://6.drm-x.com"
    ],
    "AllowedMethods": [
      "PUT"
    ],
    "AllowedHeaders": [
      "Content-Type",
      "x-amz-meta-drmx-sha256"
    ],
    "ExposeHeaders": [
      "ETag"
    ],
    "MaxAgeSeconds": 3600
  },
  {
    "AllowedOrigins": [
      "https://6.drm-x.com",
      "https://multi-drm.drm-x.com",
      "https://www.example.com"
    ],
    "AllowedMethods": [
      "GET",
      "HEAD"
    ],
    "AllowedHeaders": [
      "Range"
    ],
    "ExposeHeaders": [
      "ETag",
      "Content-Length",
      "Content-Range",
      "Accept-Ranges"
    ],
    "MaxAgeSeconds": 3600
  }
]
The first rule allows signed PUT uploads from DRM-X Console. The second allows GET/HEAD from your player website and DRM-X test pages. R2 custom domains use the bucket's CORS policy. CORS does not grant anonymous upload access.
Generate your CORS and matching URL fields
This tool runs in your browser. Enter public origins only; it does not ask for access keys.
- Protected-content base path
- Public URL prefix
- Example object key
- Example complete URL
5. Connect R2 in DRM-X 6.0#
Open Cloud Storage → Connect storage and choose Cloudflare R2.
| Field | What to enter |
|---|---|
| Display name | A friendly label, such as Production R2. |
| Bucket name | The exact bucket name, without a URL or folder. |
| Cloudflare account ID | The ID of the account that owns this bucket. |
| S3 API endpoint | Leave blank for default jurisdiction, or enter the account/jurisdiction endpoint without the bucket path. |
| Protected-content base path | protected, or blank for bucket-root uploads. |
| Public URL prefix | https://media.example.com/protected or your enabled https://pub-….r2.dev/protected URL. |
| Access key ID / Secret access key | The S3 credential pair from step 2. |
The examples use a folder called protected. The bucket name is not automatically a folder. With the direct domain-to-bucket mapping used here, include the same storage folder exactly once in the public URL prefix.
Bucket:                      customer-drm-media-example
Protected-content base path: protected
Public URL prefix:           https://media.example.com/protected
File selected for upload:    sample.encrypted.bin
Object key in the bucket:    protected/sample.encrypted.bin
Preview URL:                 https://media.example.com/protected/sample.encrypted.bin
To use the bucket root, leave the base path blank and enter only the delivery origin as the public prefix. Do not append a bucket name unless you deliberately use it as a folder. Leave CloudFront Origin path empty for this mapping.
Choose Use as default CLI upload destination if desired. Select Save and verify. Credentials are encrypted at rest and are not returned after saving. Continue to the real upload test even if verification succeeds.
6. Upload a file and verify that it works#
- Open Cloud Storage, select this destination and choose Verify location. Success means the DRM-X server can list the bucket. It does not establish write permission, browser CORS or public delivery.
- Select Upload encrypted files and choose one small encrypted segment from an existing DRM-X package. If you do not have a package, use the disposable encrypted diagnostic below. Do not upload an original video or personal document.
- Wait for the success message. Check that the filename and size appear in Cloud Storage. Find the same object under
protected/in your provider console. - Click Preview URL, and test that same object in a private browser window. It should download or return HTTP 200 without an AWS or Cloudflare login. Test an actual object: a domain's root can return 403/404 even when object delivery works.
- Check cross-origin delivery from your player website. Its browser Network panel should show
Access-Control-Allow-Originmatching the player page's origin. A direct address-bar download does not test CORS. The terminal example below also checks the headers. - Remove only your disposable diagnostic object when done. Then follow the Desktop Packager guide, select this storage destination in Package content, and upload the complete encrypted package. Manually uploading a file does not register a Published Content ID.
- Test the resulting Published file in Universal Playback Lab and your own player website. Verify video, audio, seeking and your required devices. A successful binary download is not proof of DRM playback.
No encrypted sample? Create a disposable test file on Windows
Run this in Windows PowerShell in a temporary folder you control. It encrypts a short non-personal message with a one-use AES key held only in memory. The output is a storage diagnostic, not playable media; it contains no DRM content key or customer data.
$samplePath = Join-Path (Get-Location) 'drmx-storage-check.encrypted.bin'
if (Test-Path -LiteralPath $samplePath) { throw 'Choose a new folder; this test file already exists.' }
$aes = [System.Security.Cryptography.Aes]::Create()
try {
    $aes.GenerateKey()
    $aes.GenerateIV()
    $encryptor = $aes.CreateEncryptor()
    try {
        $bytes = [Text.Encoding]::UTF8.GetBytes('DRM-X disposable storage check')
        $encrypted = $encryptor.TransformFinalBlock($bytes, 0, $bytes.Length)
        [IO.File]::WriteAllBytes($samplePath, $encrypted)
    } finally { $encryptor.Dispose() }
} finally { $aes.Dispose() }
Get-Item -LiteralPath $samplePath | Select-Object Name, Length
Upload drmx-storage-check.encrypted.bin, verify its size and Preview URL, then remove it from the bucket.
curl.exe -I -H "Origin: https://www.example.com" "https://media.example.com/protected/sample.encrypted.bin"Replace both URLs. Expect HTTP 200 and an allowed origin matching your player website. For range delivery, a GET request with Range: bytes=0-15 should return HTTP 206 and a valid Content-Range header. Preserve media MIME types: DASH manifests use application/dash+xml, HLS playlists use application/vnd.apple.mpegurl, and media files must use their appropriate media type.
7. Troubleshoot your result#
| Result | Action |
|---|---|
| Verify passes; browser upload fails | Inspect the browser Console and Network panels. Allow PUT CORS from the exact Console origin and Content-Type. Also check connectivity and retry for a fresh presigned URL. |
| Upload returns 403 | Check object write permission, bucket/folder scope, endpoint, region, request expiry and clock. Do not share signed upload URLs. |
| Upload succeeds; public URL returns 403 | Check whether public delivery is enabled and the domain/distribution has finished deploying. |
| Public URL returns 404 | Compare the full URL against the exact object key. Check missing or duplicated folders and filename case. |
| URL opens directly; player fetch fails | Add the player page origin to GET/HEAD CORS. Check CDN response headers and invalidate affected stale cached responses. |
| Download succeeds; playback fails | Check package publication, manifest paths, MIME types and DRM license authorization. See playback troubleshooting. |
Official references#
- Create an R2 bucket
- R2 credentials and permissions
- Custom domains and r2.dev
- R2 CORS and cache behavior
Using AWS? Follow Amazon S3 and CloudFront setup.